To those who know me, it’s no secret that I’m a huge fan of Neapolitan pizza. Once I (sort of) mastered that (thanks to an incredible guy called Alex – check him out on https://www.frenchguycooking.com/), I was sure I would never cook any other form of pizza ever again.
The problem is, once I found myself with some leftover unbaked sourdough bread. So I decided to shape it and bake it as a pizza. The end result was absolutely incredible. That being said, making sourdough bread is a complex process that has quite a few steps and is dependant on timing and other factors. This recipe is a much simpler way of achieving something that is somewhat of a mixture of both Neapolitan and Sourdough Pizza. Oh and its no-knead, so no-mess and no-stress either.
Servings: 2 large pizzas
Prep Time: 10-15 mins in total
Proofing time: 15 hours 1st rise, then 6-8 hours 2nd rise.
Cooking time: 4 minutes if you have a good electric oven and a pizza steel. A few minutes longer if it’s a pizza stone, and a few minutes longer than that is your oven is a bit “slow”.
Ingredients:
- 350g of tipo ’00 flour – alternatively you can use 200g of tipo ’00 flour and 150g of wholewheat flour.
- 50-60 grams of active sourdough starter* (see below if you’re wondering what this is)
- 230 ml of water
- 10 g of salt
- toppings of your own preference
- a few pinches of semolina – optional
Tools/Equipment:
- Oven
- non-stick baking paper
- pizza peel or something flat (like a non rimmed baking tray) to transfer the pizza to the oven
- pizza steel (or pizza stone)
- blow torch – optional
- Large container with a lid (or any container and some plastic film to act as a lid)
Method:
- Start this process the night before you intend to make the pizza.
- In your large container, add the rest of the flour and the salt and mix well.
- Dissolve the starter in the water and then add to the dry mixture. Mix with slightly wet hands until you’ve got a shaggy mass resembling a dough.
- Close the container and allow to rise at room temperature for around 15 hours.
- Using wet hands, divide the dough into two and form two balls by folding the edges down underneath itself. **if your dough is really wet and sticky scatter a handful of flour over the dough and using well floured hands, form two dough balls.
- Close (or cover) the container and allow to rise again for at least 6 hours, also at room temperature.
- Place your pizza steel or stone on the second highest rack in your oven. Preheat your oven for at least 30 minutes at maximum.
- Then, if your oven has an option of hot air and grill, switch to this mode, on its highest setting. If not, simply ignore this step.
- Cut out a large square of non stick baking paper and scatter some flour (or semolina) over it.
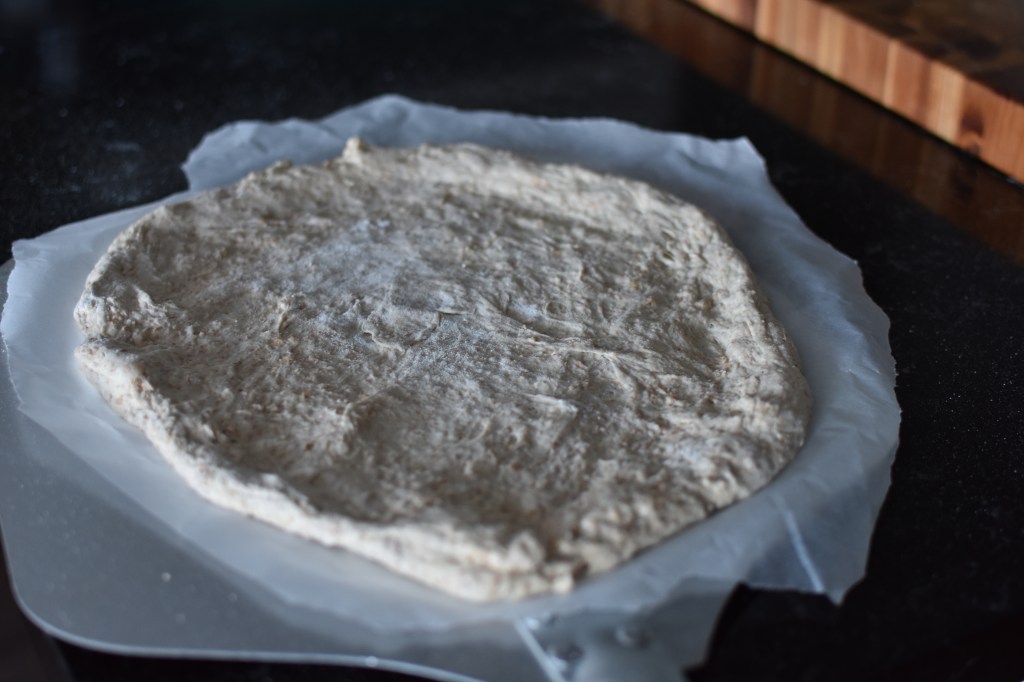
- Using lightly floured hands take one of your pizza balls and place onto your semolina/flour covered baking paper.
- Gently pull the edges (from about 3 cm int of the outer border) to stretch it to form a round shape. The whole slow rise has given you a nice fluffy dough, so try to make an effort not to flatten out the edges, otherwise you’ll miss out on that nice light crispy crust. ** if your dough seems just too sticky to handle scatter some extra flour over the dough ball as required, just enough for it to be workable.
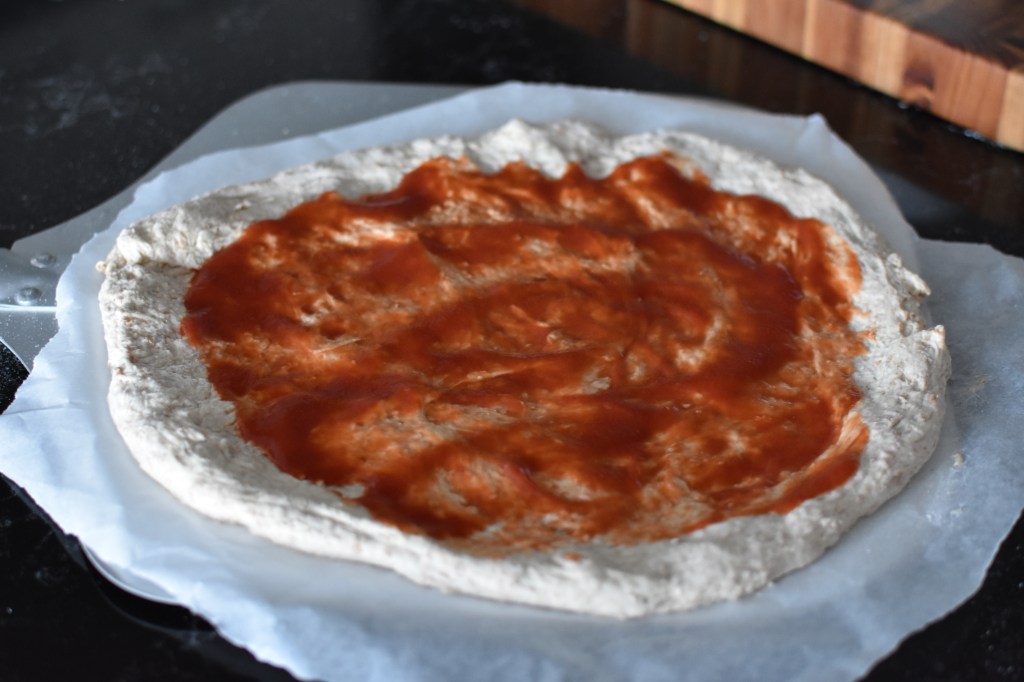
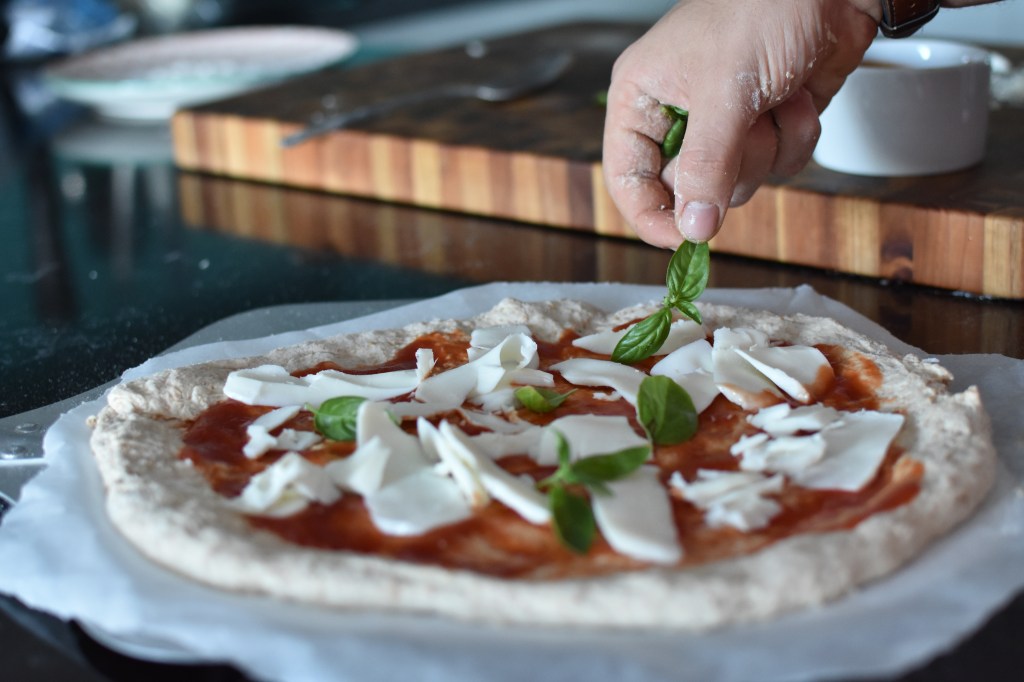
- Add your toppings.
- Trim the edges of the square of baking paper around your pizza to form a circlular border of at least 2 cm around your pizza.
- Cook for about 3-6 minutes on your pizza steel/stone (using the baking paper and a pizza peel helps with cleaning up and transferring in and out of your oven).
- Take your beautiful creation out the oven and finish with a drizzle of olive oil.
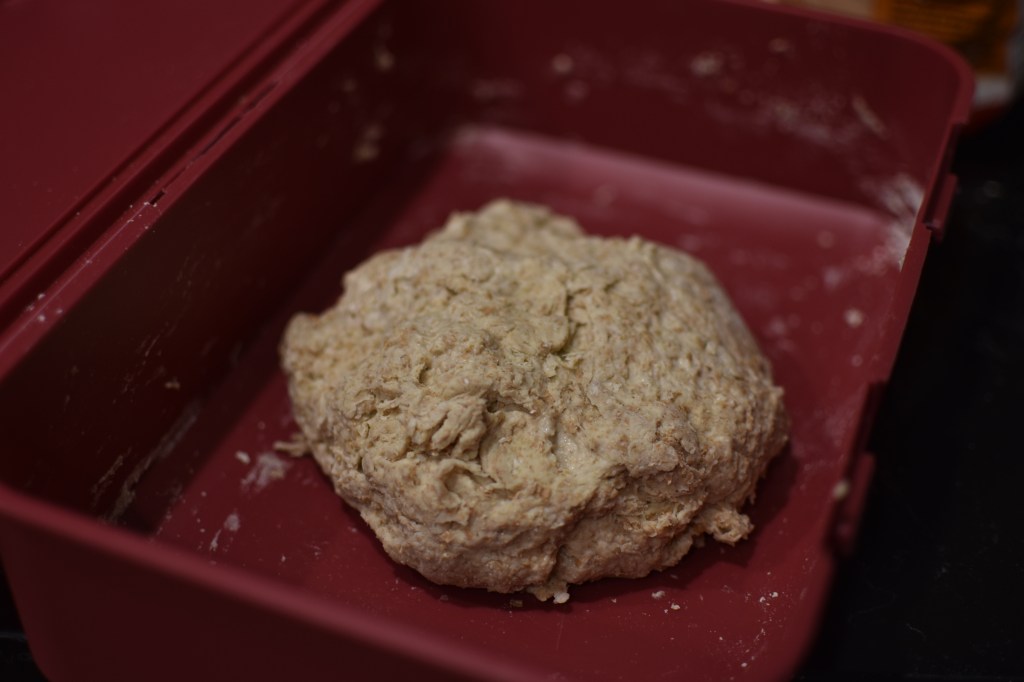
Stage 1: combining all the ingredients into a dough 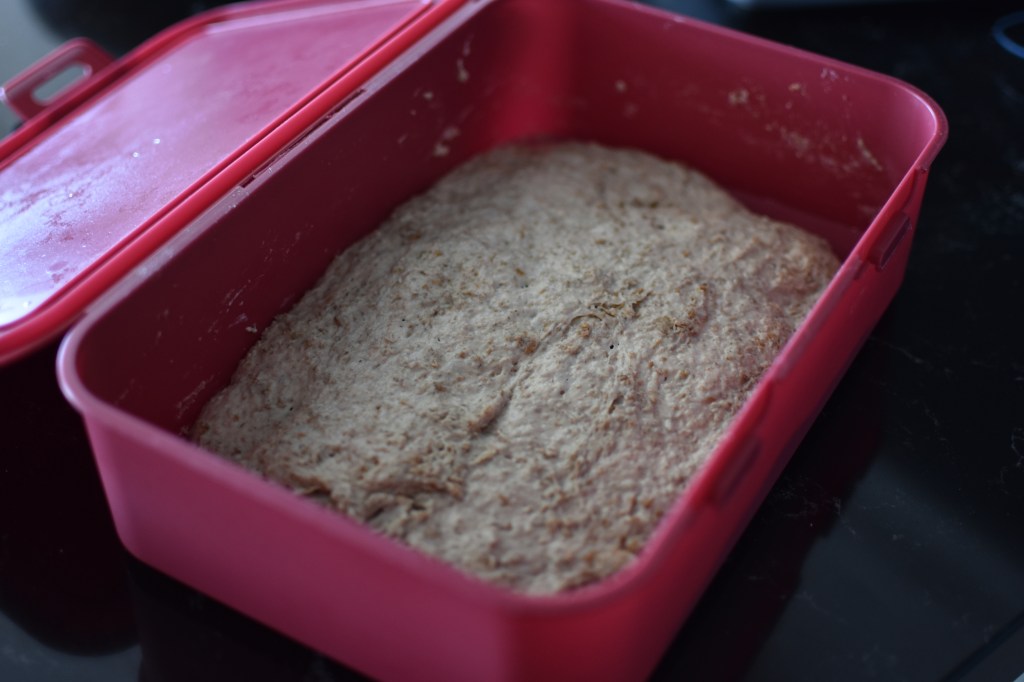
Stage 2: first proof, after 15 hours 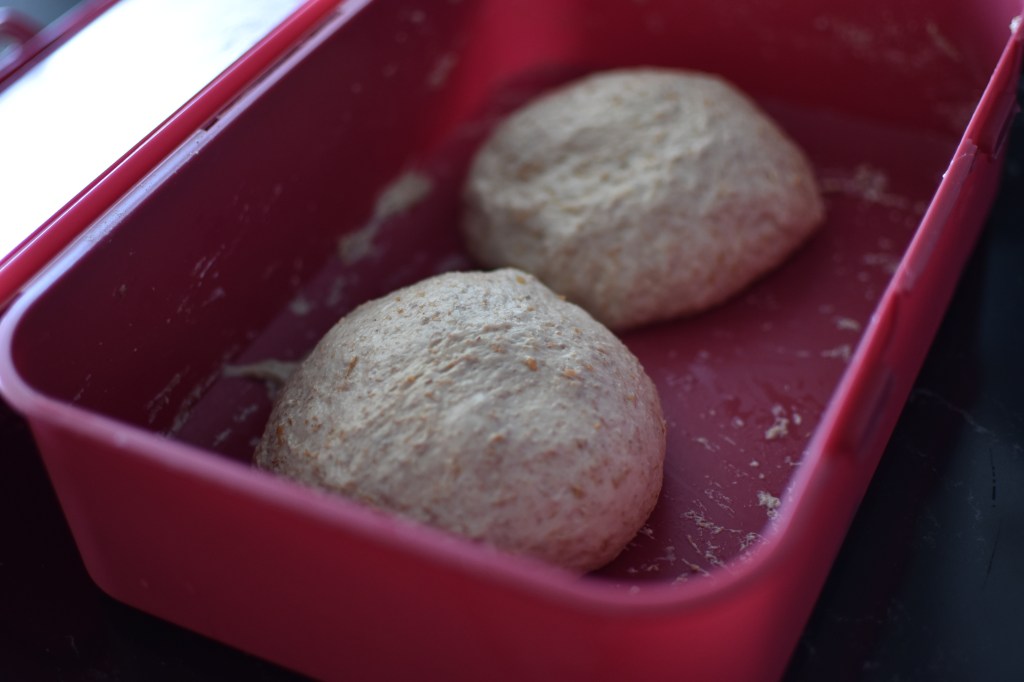
Stage 3: Dividing the dough and forming two balls 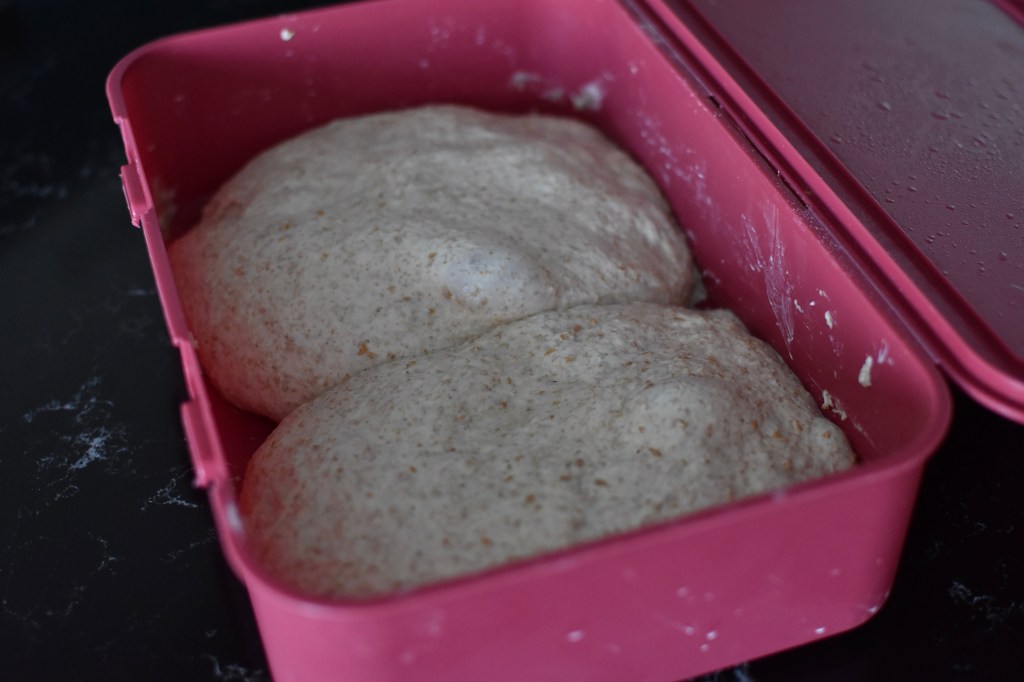
Stage 4: after second proof, ready for pizza making!
Notes:
Yes, this recipe can easily be doubled.
Yes, you can freeze leftover dough after the second rise. It works, but I reckon its never as good as the first time.
Yes, you can cheat a little and:
1) an add a teaspoon of liquid smoke into the water in the beginning to later impart that smokey wood flavour that otherwise you could only get by baking in a wood oven.
2) finish off the crust with a blow torch if you have a poor oven that just wont give you enough charring on the top.
If when you are opening up the dough it tears, don’t worry. Just tear off a small piece from the edge and patch it up 🙂 Also, do NOT use a rolling pin to roll out your dough. You’ll deflate it like a whoopee cushion.
If you have made this recipe and only want to make one pizza, feel free to chuck the final proofed dough into the fridge. It can be used within the following 48 hours.
Most doughs can range from 50% to 70% hydration. In this dough we are using a hydration (water) content of around 65%. This means that your dough is somewhat more delicate and more difficult to work with than a drier, more forgiving dough. So why such insist on such a hydration content?
Well, basically when you cook a pizza dough in an oven two things happen: it a) cooks and b) dries out. From what I have understood, the faster the cooking process, the less time there is for water to evaporate. Such a pizza would cook in around a minute in a super hot wood oven. So there’s not a lot of time for it to lose water. In a normal oven, however, it might take up to 8-10 minutes (especially if you don’t have a pizza steel or the hot air and grill option). Thus, to compensate we use these tools/techniques to speed up the cooking, and use a higher hydration dough to keep it moist. Personally I recommend a pizza steel as this conducts the heat much quicker than a pizza stone, reducing the cooking time to just around 4 minutes in a normal oven.
Regarding toppings and saucing:
If you’re going for a traditional tomato based pizza, use no more than 2 tablespoons of good quality tinned sieved tomatoes (passata) per pizza. Too much sauce will yield a soggy pizza. There no need to stay cooking up/buying some fancy pizza sauce. Just use straight out of the tin sieved tomatoes. Or crush whole tinned tomatoes. That’s it. If you find tomatoes from San Marzano, they’re probably perfect.
When it comes to toppings, try not to use toppings with too much water content. This is a Neapolitan-style pizza. Thin and crispy. It isn’t built for a can of tuna or a kilo of mushrooms. Here are some of my suggestions:
- Margherita: 2 tablespoons of sieved tomatoes, 100g of torn/grated cow’s mozzarella (not di bufala – too watery), 6 basil leaves and some grated parmesan. Finish with a drizzle of olive oil.
- Diavola: 1.5 tablespoons of sieved tomatoes, 100g of torn/grated cow’s mozzarella, 6-12 slices of spicy salami of your choice (depending on size) and some chilli flakes. Finish with a drizzle of chilli infused oil.
- Bresaola and rucola: 2 tablespoons of sieved tomatoes, 100g of torn/grated cow’s mozzarella. After baking, top with some rucola and 6-8 slices of bresaola. Finish with coarsely grated parmesan and drizzle of olive oil and lemon zest. I also love to serve a ball of mozzarella di bufala in the middle of this pizza.
- Mushrooms, Pizza Bianca: 80 g of torn/grated cow’s mozzarella, 60 g of grated scamorza cheese, handful of dry grilled mushrooms. Finish with a drizzle of truffle olive oil.
For lactose free alternatives: there are various types of shredded mozzarella style “cheeses” made out of coconut oil and flavourings, but personally I prefer opting the also wildly available lactose-free mozzarella di bufala. Just make sure if your going to be cooking it, first squeeze it a bit to remove some of the water before putting on your pizza.
I know Neapolitan pizza is not made with sourdough. This is Neapolitan-style sourdough pizza. In the sense it’s just “yeast” (found in the starter), flour, water and salt. No oil. And it’s a thin, crisp pizza.

*After all this, you’re still wondering… but what is an active sourdough starter?? It’s just a mixture of some flour and water in a jar. Well, sort of. If you want a nice summary, and a guide on how to make your own – I found this link particularly helpful. https://www.feastingathome.com/sourdough-starter/. You make it once and then keep it forever!
Otherwise, you could always just ask around for someone to give you a bit of their own starter of course!
